15
03
2009
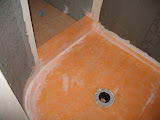 Today we finished painting the bathtub (sorry no photos) and putting in the waterproof membrane in the shower stall. The cement board was installed last week and the new cedar ceiling on Saturday so the only thing left to do to get the bathroom ready for floor tiles was to install the membrane. We’re leaving the wall membrane till later as the plumbing for the shower fixture needs to be roughed in yet and we aren’t getting the plumber back till we have the floor tile done and tub in place, sort of a chicken and egg thing.
We have also sanded, planed and routered the baseboard for the chase and applied two coats of danish . We will be adding a coat of carnuba wax on top of that and they’ll be ready to go on. We have definately turned a corner to finish work on the house, tomorrow evening I will be picking up the finish paint colour and some more trim, and this week some serious cleanup action will happen so we can work with the trim in a clean environment!
Here are some more photos of the shower stall, imagine the floor with tumbled hexagon tiles, the curved wall with polished hexagon tile, the flat walls with polished rectangular tile, and the floor outside the shower with 12″ x 24″ tiles. Hopefully the floor tiles will be installed next weekend!
Read the rest of this entry »
Comments : No Comments »
Categories : Shire Strawbale Home
12
03
2009
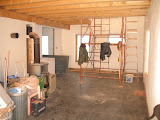
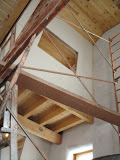
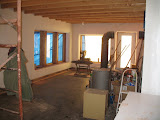 Things are progressing at the house and really starting to take shape, especially after taking a night to clean the bulk of the dirt and mud that was on the floors downstairs! When the floors are wet they look fantastic, almost like polished black marble and hopefully when polished and waxed they will keep this appearance.
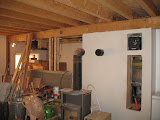
You can see the wall behind the woods tove is finally in, the stove pipe is just disconnected while I put a skim coat over the cement board so it will look as smooth as drywall. There is also a tall narrow cubby for fire wood and a shelf for our backup electric utility heater for when we are away from home for extended periods of time. The back of the firewood cubby will have a removable panel to access the back side of the fan unit in the utility room as well.
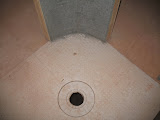
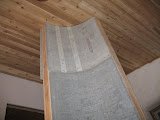
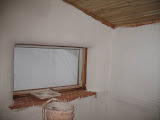
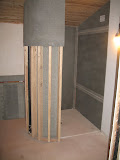 Upstairs we are finishing up the cement board work in the bathroom so tiling can begin this weekend, the shower and bottom 3′ of the walls and floors all being tiled. The curved shower wall was abit of a challenge but we found that 1/4″ cement board will bend around the radius we had as long as you eased it into it (which needs at least two sets of hands!) Our EPS foam premanufactured sloped shower base was maybe installed a bit too soon in the process and despite our best efforts to protect it has seen a few dents and dings along the way, hopefully this won’t be too big an issue after the waterproof membrane is installed over it.
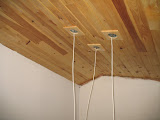
Wiring for the house has been progressing as well with lights being wiring and plugs activated in the past few days. Upstairs we are getting ready to install the living room ceiling lights and hanging lights over the stairs. Haste in putting in the ceiling led to some gaps that the light fixture bases couldn’t hide so we had to make some wooden “escutcheon” plates to make up for that.
We are hopefully selecting finish paint colours for the house and starting finish paint, tiling and finish trim this weekend! The progress on the house seems much faster now that we are past the stucco stage that I wish I could take time off to work full time on it again but I must be content with 3-4 hours a night and weekends for now!
Comments : No Comments »
Categories : Shire Strawbale Home
12
02
2009
 This past Sunday I put the last couple trowel fulls of interior stucco on the walls in the kitchen! I have some photos from the day before showing the progress so far. Now we are on to some finishing work like seam filling, cleaning, trim and limewashing.
Click on the photo in this post to go to the updated Picasa album on the house construction!
Comments : No Comments »
Categories : Shire Strawbale Home
5
02
2009
 Well it’s been a long road, a hard road, felt like a lifetime to make it, but we are nearly done of stucco on the inside of the house! We have just the kitchen and utility closet left to put finish coat on and we can finally start cleaning up the dirt and filth and move on to finish work!
Soon, soon, our house will be done!
Read the rest of this entry »
Comments : No Comments »
Categories : Shire Strawbale Home
9
01
2009
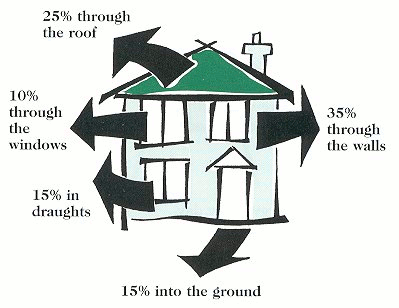 Heat rises. Such is the oft-quoted bit of wisdom used to justify preoccupation with attic insulation in houses and dismissal of the importance of basement insulation. This basic axiom is not entirely accurate however. Warm fluids (gases or liquids) will rise, this describes how heat moves via convection. Convection heat losses occur from leaks in a non airtight building envelope and in air exchanges through mechanical systems and envelope openings (door and windows). The proper use of air barriers and sealants eliminates or reduces this heat loss. This is not however the only manner of heat loss. Heat also moves via conduction and radiation.Conduction occurs when heat travels through solid matter, from an area of higher temperature to an area of lower temperature until a uniform temperature is achieved. This transfer of heat can happen in any direction, up or down, and always from hot to cold. This is the main source of heat loss in a foundation as the concrete foundation walls are in contact with the warm air inside the house and the cold ground outside the basement walls. The heat inside the house will want to travel tot he cold side of the foundation to achieve equilibrium, however the ground being an almost infinite thermal mass will continue to draw heat from the basement. The use of insulation, which is merely any material with a series of voids which breaks the thermal bridge used in conduction, stops or limits this transfer of heat.
 Radiant heat losses occur when electromagnetic radiation is released from hot matter (the filament of light bulbs, element in electric heaters or combustion of fuel). This radiation travels in a straight line from it’s source and radiates out like light (which is a form of radiation as well). This radiation is absorbed at different rates by different forms of matter, it travels through air quite easily losing little of it’s intensity while our bodies would absorb more of it and reflective surfaces like foil or mirrors actually reflect and eliminate it’s loss. Normal insulation, being made up of high amounts of voids or air spaces perform poorly in stopping radiant heat losses while large thermal masses like masonry or solid wood absorb a lot of the radiant heat as it passes through it.
Read the rest of this entry »
Comments : 1 Comment »
Categories : Energy Tip
6
01
2009
I thought it might be a good idea to look back on what we have accomplished this fall. First we finished the outside stucco work with a finish coat of lime putty and sand and had topsoil delivered which we raked, rolled and seeded.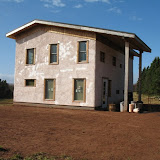
We started the inside stucco work spraying the slip on the inside of the bale walls.
Read the rest of this entry »
Comments : No Comments »
Categories : Uncategorized
6
01
2009
 So we have a new little Iz monster roaming around the house so I thought it might be time to post something on how we are trying to make this happy addition a green addition 😉
First off, the big question, cloth or disposable. And the answer is both… We got some G Diapers from Laine`s sister and we used those in combination with 7th Generation chlorine free disposables. The G diaper system is great but you need at least 2-3 of the starter kits to be practical and Isobel has already grown out of the fist size set we have. We are looking into other cloth diapers and have gotten some good advice from friends with newborns as well, but the 7th Generation diapers will fill the gap.
As far as wipes go, we decided to forgo the wet overpackaged, over scented and over processed commercial wipes and simply use reusable towels (commonly referred to as J cloths, but we have a different brand) and wet them in warm water before using them. Iz likes it better when they are warm and we just launder them with the rest of her stuff, and they are good as new! We found the packaged wipes gave her bum rashes more often.
We also used almost exclusively hand me down clothes for her with a few good “dress up” outfits we bought just for her. Hand me down toys and mats and playpens have also been a blessing as well.
If you have any good tips of green baby care, or questions, let me know!
Comments : 2 Comments »
Categories : Sustainability
1
11
2008

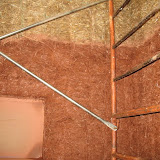
We’ve started doing interior stucco and almost immediately ran into a few stumbling blocks. Number one was the fact that without horse manure in the stucco the mixer didn’t do as good a job mixing the product. Apparently the manure was acting to keep the clay in the mix from clumping together and when we tried to mis the stucco without it all we got was a mixer full of wet sand and hard clay lumps. We would then have to mix the resulting mess by hand, essentially making the mixer useless.
 The second issue was the straw bales were starting to mold after we applied slip to the wall. This was much more worrisome than the clay not mixing in. This was the inside of our house where our new born was going to be living and breathing, with mold on the walls! We theorize that there must be mold spores on the straw and that when the wet slip was sprayed onto the walls it gave the spores the moisture needed to bloom. And because we were spraying inside, and much thicker than we did outside it was taking a long time to dry. Laine did some internet researching and we decided to try spraying the walls with pure white vinegar. This seemed to kill the blooms and inhibit the mold from coming back. We also got two dehumidifiers to run full time inside and keep the wood stove going round the clock to help dry things out.
Read the rest of this entry »
Comments : No Comments »
Categories : Shire Strawbale Home
1
11
2008
 So what happened? Where have we been? Having a baby and working on finishing our house! on August 28th, 2008, 8:35am, Isobel Rayne Collier was born weighing 6lb14oz and was 21″ long. The birth took over 30 hours and I have never been more impressed with my wife’s strength and courage.
Izzy has been home with us now for a month and her and mom are doing very well, she is gaining weight and getting stronger everyday, I don’t doubt she’ll be walking soon! For those who know us and are l;ooking for photos, go see Laine’s facebook page, she does a photo of the day, usually involving Izzy in some way.
Read the rest of this entry »
Comments : No Comments »
Categories : Shire Strawbale Home
8
07
2008
One thing I run into time and time again as an energy efficiency adviser is lack of consideration of a house, or any other building, as a system. Buildings are a complex arrangement of systems not totally dissimilar to biological ones. And what one does to one system in a building can positively or negatively impact others.
Let me give you a few examples:
Read the rest of this entry »
Comments : 1 Comment »
Categories : Energy Tip, Sustainability